Wedging Our Way
By
Tim Ard Forest Applications
Training, Inc.
How often we say,
“Get the Rope” to overcome a back leaning tree situation. I don’t disagree
with using rope, please don’t take me wrong- I use rope many times in
falling/felling plans, but I have
watched people before pulling on a rope with no concept of the mechanics,
resistance, limitation’s and risk’s taking place. I simply think pulling a rope
is the technique/tool selected because it works (sometimes), and it’s the way we
have always done it! What more do we need to discuss…. Done deal!
Well, now let’s discuss possibly
wedging our way out of those
situations.
Understanding Wedges
Wedges can be used in many felling plans to replace the rope and can be used in conjunction with rope to increase results and to support safety. Some wedge thoughts…
· A wedge can be used to lift a tree’s back lean into the desired position/direction.
· A wedge can support and stabilize a tree’s weight during a back cut.
· A wedge can be used, not only in falling trees, but in bucking and limbing.
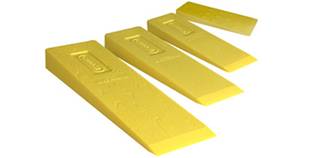
Wedge Types and Sizes
There are three types of wedges.
· Felling Wedges
· Bucking Wedges
· Splitting Wedges
Many wedge design materials.
· Dried hardwood
· Plastic (polymer) wedges
· Plastic with filler (fiberglass or other reinforcement fibers)
· Reinforced plastic with steel head surfaces
· Aluminum
· Hardened Steel
Felling Wedges - This application demands a tough wedge material of softer design that will not damage a saw chain should it come into contact. Wooden wedges can be used if they are manufactured and dried correctly of a quality wood fiber. Hickory is often used for wooden wedges. Plastic with fillers do the best for most applications. These wedges are found in lengths of 6,8,10,12,15,20 inches and sometimes longer. Felling wedges are generally of a slow taper design. If the taper is too fast it will create resistance to the lift. Thin, slow tapers lift with less hammer assistance.
Felling wedges can be found with several taper designs:
Single Taper – One side of the wedge is actually flat and the lift side is sporting the taper.
Double Taper – Both sides of the wedge have a starting and lifting taper.
Triple Taper – The wedge taper starts similar to the single taper but about half way into the taper, it steps up the degree of taper. This works great for smaller trees for quicker lift and on heavier/larger trees it lifts slowly to get the action started and then a quicker lift takes over. The triple taper wedge is not one generally used for stacking techniques.
Bucking Wedges - Wedges used for bucking can be of a softer material as it is not as critical if the wedge compresses under the load. Wood or plastic will work fine to hold the kerf width to keep from pinching a saw in the bucking process. A thick taper or shorter wedge makes a good design for this application. If you need to use a wedge to assist in getting a stuck or pinched saw out of a kerf, then it may be good to have a reinforced design that will hold up to a hammer impact.
Splitting Wedges
- Splitting wedges are used to split wood for firewood or fence-rail
production. They are most often made of hardened steel or forgings that are
designed to take the hammer impact and separate the wood being split. Splitting
wedges are usually very heavy and have a steep taper to quickly separate the
wood fibers. Some are in wedge shape and some are in a cone design to do the
job. They are not to be used for working around the chainsaw.
Contacting the saw chain to a steel splitting wedge can be devastating to the
saw chain and cause reactive forces that can injure an operator or bystander.
Wedge Review
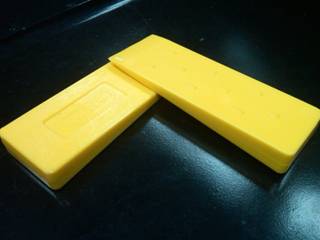
I have used wedges sold by different companies for years
and in the past few months really grown fond of
Oregon®
Wedges. I have used the smaller wedges in the Oregon®
line because I like the serrations on wedge for working with smaller trees and
bucking situations.
The diamond shape of the serrations helps to hold the wedge in the kerf.
However, on larger trees and heavy lifting, I have found the serrations to be something that can cause resistance in the wedging process.
Under heavy load (weight) the serrations seem to make it a bit harder to enter
the kerf, having to hit harder with the hammer to gain wedge lift. Another issue
with the serrations - if you stack wedges you must make sure to cross the wedges
with the smooth sides together. I have found that if I file off the serrations
when felling larger trees, the resistance is less, lift is faster and smoother
with less pressure and I can pay less attention to the stacking procedures. Some
other brands do not have the feature on larger wedge formats. The Oregon®
wedges are of a really tough material and I have not had any cracking or
breaking problems with them, even in the cold temperatures the past few months.
the serrations to be something that can cause resistance in the wedging process.
Under heavy load (weight) the serrations seem to make it a bit harder to enter
the kerf, having to hit harder with the hammer to gain wedge lift. Another issue
with the serrations - if you stack wedges you must make sure to cross the wedges
with the smooth sides together. I have found that if I file off the serrations
when felling larger trees, the resistance is less, lift is faster and smoother
with less pressure and I can pay less attention to the stacking procedures. Some
other brands do not have the feature on larger wedge formats. The Oregon®
wedges are of a really tough material and I have not had any cracking or
breaking problems with them, even in the cold temperatures the past few months.
I use 12” wedges for most of my work felling and bucking no matter the tree size. The 8” I prefer if working bucking a lot of firewood.
Stacking wedges
When at a training session in Indiana years ago with Soren
Eriksson, we encountered a wedge stacking technique I use now consistently. One
of the class participants started the lift of the tree with two wedges, side by
side. As the kerf was opened, he took one wedge out and placed a third wedge in
the system, stacking it at 90 degrees and placing it in the wider kerf.
 The
resistance was less and the stack of the wedges now lifted the tree quickly on
over. This was on a 110’ tall Poplar tree of approx 48” DBH with probably 7’ of
back lean. He used two of those wedge stacks and took the tree over on target.
The technique WORKS! Note:
To stack wedges you must have at least three wedges.
The
resistance was less and the stack of the wedges now lifted the tree quickly on
over. This was on a 110’ tall Poplar tree of approx 48” DBH with probably 7’ of
back lean. He used two of those wedge stacks and took the tree over on target.
The technique WORKS! Note:
To stack wedges you must have at least three wedges.
The first step is to determine how many segments are in the tree.
You’re probably saying, I don't understand this segment thing. Well imagine a
segment as a square with its sides equal to your tree base measurement from the
hinge to the wedge point at the rear of the tree. If the tree has, say, 70
segments in it imagine 70 squares stacked on top of each other laying parallel
to a line running up the middle of the tree's trunk.
If you were to back cut the tree properly and insert a 1-inch (thick) wedge at
the furthest back point on the stump to support the tree, you now want to know
how far forward (direction opposite of tree's lean) you can move the center
point of the tree's weighted back lean using this wedge. Remember—for the
tree to fall in the direction opposite of it's lean, you have to move the
weighted center of the tree past the pivot point (an imaginary
line running vertical above the front of the hinge). If you were to
drive the wedge in until it is flush with the tree's trunk, you would lift the
back corner of the first segment (square) one inch. Correspondingly, this would
move the opposite corner one inch toward the direction you want the tree to
fall. But, how many inches did the opposite corner of the second square
(segment) move? If you said two inches, you're correct. How many inches did the
opposite corner of the seventieth section move toward the direction of fall
seventy inches? Therefore, you know
that in this example a one-inch wedge will lift or move the top of this 70
segment tree 70 inches in the opposite direction. If, in this example,
Measurement B is less than 70 inches, only one, 1-inch wedge would be needed to
lift the top of the tree past the center pivot point, thus allowing the tree to
fall in the direction opposite of its lean.
What does this tell us about the ability to wedge different size trees of the
same height? Smaller diameter trees (trees with a smaller Measurement A) will
have more segments and, therefore, can be wedged (lifted) further than a larger
diameter tree of the same height. For example, a tree with a 6-inch base
(Measurement A) that is 70 feet tall would have 140 segments, and a 70-foot tree
with an 18-inch base (Measurement A) would have 46 segments. Consequently a
1-inch wedge will move the top of the 6-inch tree 140 inches, while the 18-inch
tree's top will move only 46 inches using the same wedge.
For text with Illustrations go to
Tim’s Tips
Wedging Tips on the Forest Applications Website.
I have written wedge calculations in detail on my Cross-Sight Instructions also… you can find information in detail in our Forest Applications eBook.
Calculating Resistance Factor
I received this message with some very precise statements of wedging theory. Thank you Bickers5 for taking the time to stimulate a conversation about questions a lot of operators have…
Concerning the segmenting of trees for wedge calculations.
It occurs to me that this is a brilliant aid for the beginner or the pro.
Beginner on many trees and the pro on a few borderline trees.
However, it doesn't factor in resistance limitations.
At some point, even with dimensions being acceptable based on hinge to wedge
leverage etc., the weight of the tree leaning backwards may prevent any
particular wedge and/or wedging technique from changing the lean of the tree,
even though a wedge provide the height needed.
Do you know of anyone that has put together a field calculation 'rule of thumb'
or chart on what can be lifted?
I realize this is a daunting task with the variability’s of wet and dry wood,
species, wedge shape, wedge length, wedge combinations, distance from wedge to
hinge, limb weight and even wind etc. (Excerpt from a Message from Bickers5)
Thank You and In
Answer….
A few very predictable ways to lift even the heaviest of tree-
1. Realize every tree is different. Not because they are eastern or western but because they are a tree. The size and weight is a variable on every tree. For years it is followed that only experienced fallers should approach trees over two foot diameter. Brushing definitions stop at a diameter over five inches. Statistics I have heard over the years is that many fatalities in logging (professionals) occur from struck by’s involving hung and falling trees less than eight inches in diameter. It doesn’t take a big tree to cause life or property damage. Even from a production standpoint small trees cost money to harvest. If you are not proficient with them it’s hard to survive out there.
2. Take accurate information! If you miscalculate the lean amounts it can mean failure. Even if you are good at lean discernment, one of the problems I encounter with trees everywhere is their ability to intertwine. One limb touching in the top somewhere (often limbs will graft/grow together) will keep even the best wedge or jack from lifting a tree.
3. The ability of the wedge to lift a selected tree is simply the size of the hammer! Yes, there is a limitation of resistance created by the length and taper of the wedge and the material of which it is made. But if the wedge is capable of supporting the weight (design factor) it will lift the heaviest tree if the hammer (and hammer operator) will apply the weight (enough weight) to its head.
4. Make sure you understand the term Hinge = Friend. You see, many times tree falling techniques work against the ability of the hinge. Uneven hinges and unbendable hinges can create unplanned results. If the hinge is too thick (wide) it has added resistance to the wedge lift of the tree. A hinge that is too wide will not bend; it simply resists the lifting action of the wedge and adds to the “weight” of the tree. I watch techniques of making a back cut in the tree, place a wedge, hammer and hammer to try to lift the tree so more back cut can be continued to establish a hinge that will bend. When you hammer a wedge too much with too much hinge (often half a tree) width in place you simply create more resistance and even fiber compression in the support area of the wedge. This works negatively in your lift calculation.
5. The face notch can also be a factor in resistance. I hear sometimes that the “Open-Face” technique is not accepted and perceived inaccurate because of what is really a problem with the back cut. (The Open-Face notch is the face notch pioneered by Soren Eriksson. He is the promoter or originator of the Open-Face Technique into North America and most of the world). The Open-Face Technique concentrates on and takes advantage of a face notch that is 70 degrees or more in the notch opening. It has nothing to do with the back cut other than - with a 70 degree plus notch it enables the back cut to be level to the back corner of the notch instead of using a “stump shot” or back cut higher that the notch level. The hinge is intact throughout the tree fall and it limits the ability of the tree to “butt rebound”. If the opening of the notch is less than 70 degrees a “stump shot” is absolutely necessary because the hinge will break before the tree is parallel to the ground. A 45 degree notch opening will break the hinge half way to the ground on a straight tree. If it leans back, even sooner! A notch understanding is critical!
6. On a heavy back leaner the notch and hinge placement deserves a point of its own. The further a notch is cut into a back leaner, the less leverage you have with the wedge. Your lift is increased in speed, but the pressure to lift the weight resistance is increased. The longer distance you have from the hinge to the wedge placed in the back of the tree, the more leverage against the tree weight and resistance you have for the lift. One of the most common mistakes in making a notch is a “Dutchman” or by-pass created in the corner of the notch. This mismatch causes the notch to simply not work. When the mismatch closes, which may not be far in movement of the tree, resistance is created that no wedge or even tree jack is going to overcome without breaking the hinge and causing loss of control.
Summary
Taking these six (and probably more could be discussed) POINTS into consideration there cannot be a rule of thumb on tree lift. No chart can be compiled that will answer all the many variables. The solution goes back to my answer to a common question I am asked just about weekly. The question – “How would you cut this tree I have?” I always answer with – “Can a 600 lb Bear climb a 3 inch pole?” Think about it, you have to know first how strong that particular pole is and then the climbing ability of the bear. Now let’s put together a chart on that one….
The tree height and lift segments can be calculated very accurately, thus giving the ability to plan the possibilities of wedge or tree jack lift – it’s mechanical – but the variables can only be assessed on the particular and unique tree.
I can tell you from my experience, cutting trees across the country, if my complete plan is intact and I perform the notch and back cuts correctly to my plan - establishing a workable hinge to take over the control; I will achieve the desired results within a few hits of a big (sufficient) hammer.
I will have a video out this year in our Forest Applications Training, Inc. eVideo Series that will explain in action these concepts. Stay tuned to ChainPoint Connection eNewsletter to find out the release date. Subscribe to ChainPoint
SAFETY – Wedges of
all types can split, chip, fly out and hurt! Always wear safety glasses when
using wedges. Face protection is also a plus to consider in wedging tasks. If
you hold a wedge in splitting applications always use gloves to protect your
hands.
For text on wedge use with Illustrations go to
Tim’s Tips
Wedging Tips on the Forest Applications Website.
I have written about wedge calculations in detail on my Cross-Sight Instructions also… you can find information in detail in our Forest Applications eBook.
Oregon® Wedges can be purchased through Oregon® retailers across the country. Oregon®
Good Sawing!